在线时间20 小时
UID357677
ROHM金币0
注册时间2018-5-9
该用户从未签到
高级会员
- 最后登录
- 2023-8-24
|
本期我们将一边解读程序内容一边学习TFT显示器的操作!
目 录- 用Arduino在TFT液晶显示器上显示
- 尝试利用加速度传感器的数值绘制图表
- 总结
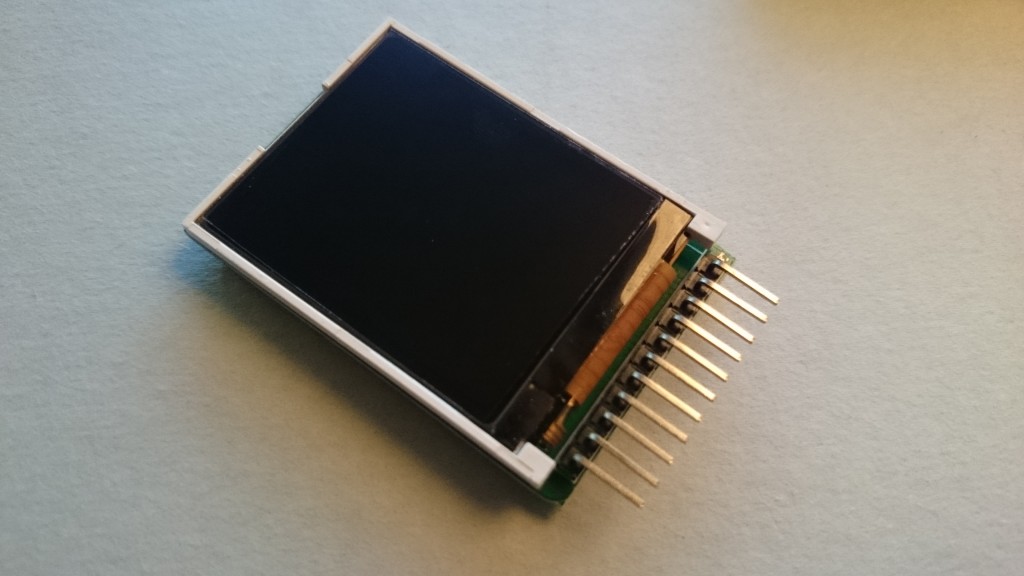
1.用Arduino在TFT液晶显示器上显示本期使用的TFT显示器是sainsmart公司的ST7735R显示器。此款显示器是一种小型显示器,除了Arduino外,Raspberry Pi等也可使用。上面贴装有microSD卡槽,可进行数据的读写。本期只尝试TFT显示器的显示功能。
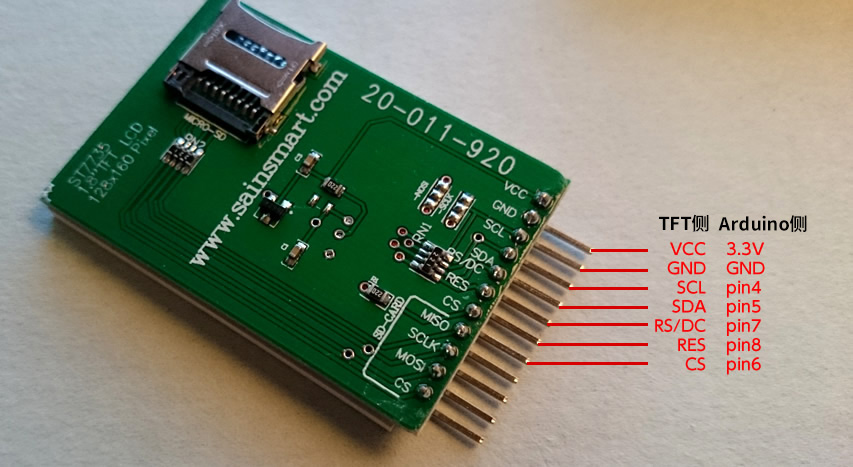
首先,连接Arduino和TFT显示器。

照片1 TFT显示器

照片2 TFT显示器的背面
顺便说一句,写在电路板上的引脚名称及作用大致如下:
- VCC – 电源输入(Correction Voltage)
- GND – 接地(Ground)
- SCL – 串行时钟线(Serial Clock Line)
- SDA – 串行数据线(Serial Data Line)
- RS/DC – 指令/数据选取(Command/Data Selection)
- RES – 复位(LCD Controller Reset)
- CS – 芯片选择(Chipselect for TF Card)
Arduino和TFT显示器连接完毕后,就可以试着运行样本程序。
使TFT显示器的库适用于Arduino虽然该TFT显示器利用库ST7735R可以在Arduino上显示,但ST7735R无法直接用于Arduino,因此需要更改部分库文件。
SainSmart 1.8 ST7735R TFT LCD Module with MicroSD LED Backlight For Arduino Raspberry Pi
下载库(ST7735R V0.2)
打开上面的URL,在网页最下面有下载链接,点击写有"Download Link"的链接地址,即可将库、样本代码、文件等整套下载下来。下载完毕,解压压缩文件后,则可改写必要的文件。
文本用可编辑"ST7735.h"的编辑器打开后,更改第4行的如图所示部分。这样一来,即使Arduino也可以使用。

文件更改完毕后,请将解压的"TFT18"目录再次压缩为zip等格式,在Arduino(或Arduino Create)的Add Library作为库添加,或者设置在位于Arduino安装目录的"libraries"目录下来读取库。
读取完毕后,从sketch的样本尝试运行"TFT18"-"graphictest"。
查看样本程序,可以确认显示非常顺畅。
样本程序 – graphictest
- //引脚的设定
-
- #define sclk 4
-
- #define mosi 5
-
- #define cs 6
-
- #define dc 7
-
- #define rst 8
-
-
-
- //使用的颜色编号
-
- #define BLACK 0x0000
-
- #define BLUE 0x001F
-
- #define RED 0xF800
-
- #define GREEN 0x07E0
-
- #define CYAN 0x07FF
-
- #define MAGENTA 0xF81F
-
- #define YELLOW 0xFFE0
-
- #define WHITE 0xFFFF
-
-
-
- #include <ST7735.h>
-
- #include <SPI.h>
-
-
-
-
- ST7735 tft = ST7735(cs, dc, mosi, sclk, rst);
-
-
-
-
-
- void fillpixelbypixel(uint16_t color) {
-
- for (uint8_t x=0; x < tft.width; x++) {
-
- for (uint8_t y=0; y < tft.height; y++) {
-
- tft.drawPixel(x, y, color);
-
- }
-
- }
-
- delay(100);
-
- }
-
-
-
- void setup(void) {
-
- Serial.begin(9600);
-
- Serial.print("hello!");
-
- tft.initR(); // initialize a ST7735R chip
-
-
-
-
- Serial.println("init");
-
- tft.writecommand(ST7735_DISPON);
-
-
-
- uint16_t time = millis();
-
- tft.fillScreen(BLACK);
-
- time = millis() - time;
-
-
-
- Serial.println(time, DEC);
-
- delay(500);
-
-
-
- //
-
- tft.fillScreen(BLACK);
-
- testdrawtext("Lorem ipsum dolor sit amet, consectetur adipiscing elit.
-
- Curabitur adipiscing ante sed nibh tincidunt feugiat. Maecenas enim massa,
-
- fringilla sed malesuada et, malesuada sit amet turpis. Sed porttitor neque ut
-
- ante pretium vitae malesuada nunc bibendum. Nullam aliquet ultrices massa eu
-
- hendrerit. Ut sed nisi lorem. In vestibulum purus a tortor imperdiet
-
- posuere. ", WHITE);
-
- delay(1000);
-
-
-
- //a single pixel
-
- tft.drawPixel(tft.width/2, tft.height/2, GREEN);
-
- delay(500);
-
-
-
- // line draw test
-
- testlines(YELLOW);
-
- delay(500);
-
-
-
- // optimized lines
-
- testfastlines(RED, BLUE);
-
- delay(500);
-
-
-
- testdrawrects(GREEN);
-
- delay(500);
-
-
-
- testfillrects(YELLOW, MAGENTA);
-
- delay(500);
-
-
-
- tft.fillScreen(BLACK);
-
- testfillcircles(10, BLUE);
-
- testdrawcircles(10, WHITE);
-
-
-
- Serial.println("done");
-
- delay(1000);
-
- }
-
-
-
- void loop() {
-
- tft.writecommand(ST7735_INVON);
-
- delay(500);
-
- tft.writecommand(ST7735_INVOFF);
-
- delay(500);
-
- }
-
-
-
- void testlines(uint16_t color) {
-
- tft.fillScreen(BLACK);
-
- for (uint16_t x=0; x < tft.width; x+=6) {
-
- tft.drawLine(0, 0, x, tft.height-1, color);
-
- }
-
- for (uint16_t y=0; y < tft.height; y+=6) {
-
- tft.drawLine(0, 0, tft.width-1, y, color);
-
- }
-
-
-
- tft.fillScreen(BLACK);
-
- for (uint16_t x=0; x < tft.width; x+=6) {
-
- tft.drawLine(tft.width-1, 0, x, tft.height-1, color);
-
- }
-
- for (uint16_t y=0; y < tft.height; y+=6) {
-
- tft.drawLine(tft.width-1, 0, 0, y, color);
-
- }
-
-
-
- tft.fillScreen(BLACK);
-
- for (uint16_t x=0; x < tft.width; x+=6) {
-
- tft.drawLine(0, tft.height-1, x, 0, color);
-
- }
-
- for (uint16_t y=0; y < tft.height; y+=6) {
-
- tft.drawLine(0, tft.height-1, tft.width-1, y, color);
-
- }
-
-
-
- tft.fillScreen(BLACK);
-
- for (uint16_t x=0; x < tft.width; x+=6) {
-
- tft.drawLine(tft.width-1, tft.height-1, x, 0, color);
-
- }
-
- for (uint16_t y=0; y < tft.height; y+=6) {
-
- tft.drawLine(tft.width-1, tft.height-1, 0, y, color);
-
- }
-
-
-
- }
-
-
-
- void testdrawtext(char *text, uint16_t color) {
-
- tft.drawString(0, 0, text, color);
-
- }
-
-
-
- void testfastlines(uint16_t color1, uint16_t color2) {
-
- tft.fillScreen(BLACK);
-
- for (uint16_t y=0; y < tft.height; y+=5) {
-
- tft.drawHorizontalLine(0, y, tft.width, color1);
-
- }
-
- for (uint16_t x=0; x < tft.width; x+=5) {
-
- tft.drawVerticalLine(x, 0, tft.height, color2);
-
- }
-
- }
-
-
-
- void testdrawrects(uint16_t color) {
-
- tft.fillScreen(BLACK);
-
- for (uint16_t x=0; x < tft.width; x+=6) { tft.drawRect(tft.width/2 -x/2,
-
- tft.height/2 -x/2 , x, x, color); } } void testfillrects(uint16_t color1,
-
- uint16_t color2) { tft.fillScreen(BLACK); for (uint16_t x=tft.width-1; x > 6;
-
- x-=6) {
-
- tft.fillRect(tft.width/2 -x/2, tft.height/2 -x/2 , x, x, color1);
-
- tft.drawRect(tft.width/2 -x/2, tft.height/2 -x/2 , x, x, color2);
-
- }
-
- }
-
-
-
- void testfillcircles(uint8_t radius, uint16_t color) {
-
- for (uint8_t x=radius; x < tft.width; x+=radius*2) {
-
- for (uint8_t y=radius; y < tft.height; y+=radius*2) {
-
- tft.fillCircle(x, y, radius, color);
-
- }
-
- }
-
- }
-
-
-
- void testdrawcircles(uint8_t radius, uint16_t color) {
-
- for (uint8_t x=0; x < tft.width+radius; x+=radius*2) {
-
- for (uint8_t y=0; y < tft.height+radius; y+=radius*2) {
-
- tft.drawCircle(x, y, radius, color);
-
- }
-
- }
-
- }
在上面的程序中,TFT操作的中心函数如下:
- tft.drawPixel(x,y,color); - 在指定位置(x,y)显示指定颜色(color)的点。
- tft.drawCircle(x, y, radius, color); - 在指定位置(x,y)绘制指定半径(radius)的圆。
- tft.fillRect(x1,y1, x2, y2, color); - 以指定位置1(x1,y1)到位置2(x2,y2)之间的宽度和高度涂一个长方形。
- tft.drawString(x, y, text, color); - 在指定位置(x,y)用指定颜色(color)显示文本。
- tft.fillScreen(0x0000); - 整个显示器屏幕按指定颜色显示
此外还有几个函数,但基本上用这些就可以实现丰富的表现。
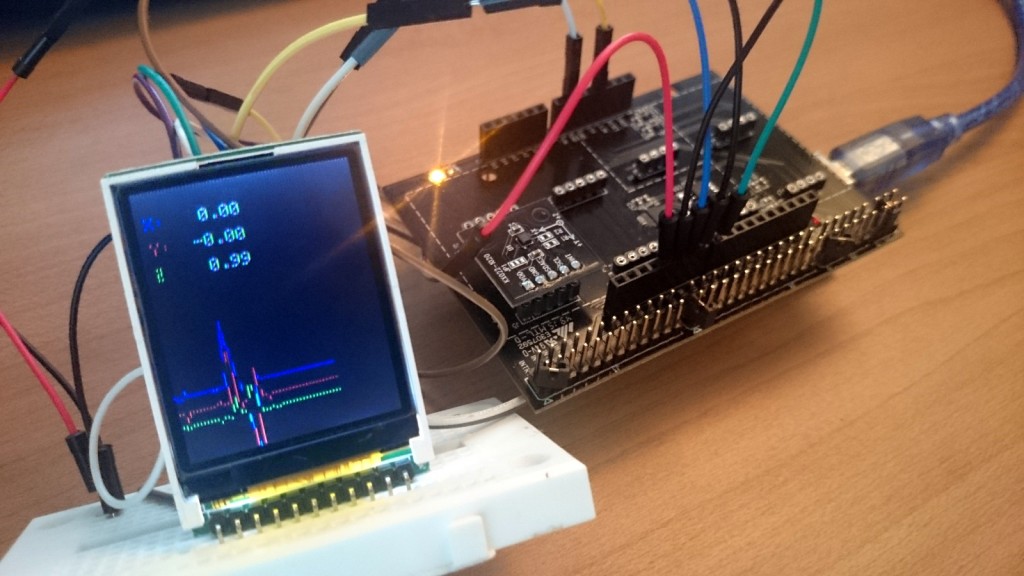
2.尝试利用加速度传感器的数值绘制图表确认完TFT显示器的工作后,接下来我们试着在TFT显示器上显示加速度传感器的值。使用传感器评估套件时,只要将加速度传感器安装在套件上,基本上就不用更改TFT显示器侧的配线了。

照片3 加速度传感器和TFT显示器
显示加速度传感器数值的程序
- #include <Wire.h>
-
- #include <KX022.h>
-
- #include <ST7735.h>
-
- #include <SPI.h>
-
-
-
-
-
- // You can use any (4 or) 5 pins
-
- #define sclk 4
-
- #define mosi 5
-
- #define cs 6
-
- #define dc 7
-
- #define rst 8 // you can also connect this to the Arduino reset
-
-
-
- // Color definitions
-
- #define BLACK 0x0000
-
- #define BLUE 0x001F
-
- #define RED 0xF800
-
- #define GREEN 0x07E0
-
- #define CYAN 0x07FF
-
- #define MAGENTA 0xF81F
-
- #define YELLOW 0xFFE0
-
- #define WHITE 0xFFFF
-
-
-
- ST7735 tft = ST7735(cs, dc, mosi, sclk, rst);
-
-
-
- KX022 kx022(KX022_DEVICE_ADDRESS_1E);
-
-
-
- int _cnt = 0;
-
- //图表初始位置
-
- int _xc = 120;
-
- int _yc = 130;
-
- int _zc = 140;
-
-
-
-
- void fillpixelbypixel(uint16_t color) {
-
- for (uint8_t x=0; x < tft.width; x++) {
-
- for (uint8_t y=0; y < tft.height; y++) {
-
- tft.drawPixel(x, y, color);
-
- }
-
- }
-
- delay(100);
-
- }
-
-
-
- void setup(void) {
-
- byte rc;
-
-
-
- Serial.begin(9600);
-
- while (!Serial);
-
- Wire.begin();
-
- tft.initR(); // initialize a ST7735R chip
-
- rc = kx022.init();
-
- tft.fillScreen(BLACK);
-
-
-
-
- 1.显示文字DEVICE PLUS
-
- testdrawtext("DEVICE PLUS!!", WHITE,25,50);
-
- delay(1000);
-
- tft.fillScreen(BLACK);
-
- }
-
-
-
- void loop() {
-
- //KX022
-
- byte rc;
-
- float acc[3];
-
-
-
- //2.获取加速度传感器的值
-
- rc = kx022.get_val(acc);
-
- if (rc == 0) {
-
- Serial.write("KX022 (X) = ");
-
- Serial.print(acc[0]);
-
- Serial.println(" [g]");
-
- Serial.write("KX022 (Y) = ");
-
- Serial.print(acc[1]);
-
- Serial.println(" [g]");
-
- Serial.write("KX022 (Z) = ");
-
- Serial.print(acc[2]);
-
- Serial.println(" [g]");
-
- Serial.println();
-
-
-
- //将float型转换为char型
-
- char xVal[10];
-
- dtostrf(acc[0], 5, 2, xVal);
-
- char yVal[10];
-
- dtostrf(acc[1], 5, 2, yVal);
-
- char zVal[10];
-
- dtostrf(acc[2], 5, 2, zVal);
-
-
-
- //转换为TFT液晶
-
- //tft.fillScreen(BLACK);
-
- tft.fillRect(0,0, 120, 60, BLACK);
-
- testdrawtext("X:", RED, 5, 15);
-
- testdrawtext(xVal, WHITE, 30, 15);
-
- testdrawtext("Y:", BLUE, 5, 30);
-
- testdrawtext(yVal, WHITE, 30, 30);
-
- testdrawtext("Z:", GREEN, 5, 45);
-
- testdrawtext(zVal, WHITE, 30, 45);
-
-
-
- //3.绘制图表
-
- int x = int(acc[0]*100)+120;
-
- int y = int(acc[1]*100)+130;
-
- int z = int(acc[2]*100)+40;
-
- tft.drawLine(_cnt-1, _xc, _cnt, x, RED);
-
- tft.drawLine(_cnt-1, _yc, _cnt, y, BLUE);
-
- tft.drawLine(_cnt-1, _zc, _cnt, z, GREEN);
-
-
-
- _cnt++;
-
- //到达画面边缘时复位
-
- if(_cnt > 120){
-
- _cnt = 0;
-
- tft.fillScreen(BLACK);
-
- }
-
-
-
- _xc = x;
-
- _yc = y;
-
- _zc = z;
-
-
-
- delay(10);
-
- }
-
- delay(10);
-
- }
-
-
-
- void testlines(uint16_t color) {
-
- tft.fillScreen(BLACK);
-
- for (uint16_t x=0; x < tft.width; x+=6) {
-
- tft.drawLine(0, 0, x, tft.height-1, color);
-
- }
-
- for (uint16_t y=0; y < tft.height; y+=6) {
-
- tft.drawLine(0, 0, tft.width-1, y, color);
-
- }
-
-
-
- tft.fillScreen(BLACK);
-
- for (uint16_t x=0; x < tft.width; x+=6) {
-
- tft.drawLine(tft.width-1, 0, x, tft.height-1, color);
-
- }
-
- for (uint16_t y=0; y < tft.height; y+=6) {
-
- tft.drawLine(tft.width-1, 0, 0, y, color);
-
- }
-
-
-
- tft.fillScreen(BLACK);
-
- for (uint16_t x=0; x < tft.width; x+=6) {
-
- tft.drawLine(0, tft.height-1, x, 0, color);
-
- }
-
- for (uint16_t y=0; y < tft.height; y+=6) {
-
- tft.drawLine(0, tft.height-1, tft.width-1, y, color);
-
- }
-
-
-
- tft.fillScreen(BLACK);
-
- for (uint16_t x=0; x < tft.width; x+=6) {
-
- tft.drawLine(tft.width-1, tft.height-1, x, 0, color);
-
- }
-
- for (uint16_t y=0; y < tft.height; y+=6) {
-
- tft.drawLine(tft.width-1, tft.height-1, 0, y, color);
-
- }
-
- }
-
-
-
- void testdrawtext(char *text, uint16_t color,int x,int y) {
-
- tft.drawString(x, y, text, color);
-
- }
-
-
-
- void testfastlines(uint16_t color1, uint16_t color2) {
-
- tft.fillScreen(BLACK);
-
- for (uint16_t y=0; y < tft.height; y+=5) {
-
- tft.drawHorizontalLine(0, y, tft.width, color1);
-
- }
-
- for (uint16_t x=0; x < tft.width; x+=5) {
-
- tft.drawVerticalLine(x, 0, tft.height, color2);
-
- }
-
- }
-
-
-
- void testdrawrects(uint16_t color) {
-
- tft.fillScreen(BLACK);
-
- for (uint16_t x=0; x < tft.width; x+=6) { tft.drawRect(tft.width/2 -x/2,
-
- tft.height/2 -x/2 , x, x, color); } } void testfillrects(uint16_t color1,
-
- uint16_t color2) { tft.fillScreen(BLACK); for (uint16_t x=tft.width-1; x > 6;
-
- x-=6) {
-
- tft.fillRect(tft.width/2 -x/2, tft.height/2 -x/2 , x, x, color1);
-
- tft.drawRect(tft.width/2 -x/2, tft.height/2 -x/2 , x, x, color2);
-
- }
-
- }
-
-
-
- void testfillcircles(uint8_t radius, uint16_t color) {
-
- for (uint8_t x=radius; x < tft.width; x+=radius*2) {
-
- for (uint8_t y=radius; y < tft.height; y+=radius*2) {
-
- tft.fillCircle(x, y, radius, color);
-
- }
-
- }
-
- }
-
-
-
- void testdrawcircles(uint8_t radius, uint16_t color) {
-
- for (uint8_t x=0; x < tft.width+radius; x+=radius*2) {
-
- for (uint8_t y=0; y < tft.height+radius; y+=radius*2) {
-
- tft.drawCircle(x, y, radius, color);
-
- }
-
- }
-
- }
启动上面的程序后,就会显示上期介绍的加速度传感器数值的图表。
程序的流程如下:
- 在setup内显示"DEVICE PLUS!!"文字
- 获取加速度传感器的值并取整
- 根据数值显示图表和文本
本期是每帧都在x轴上加1,从左向右绘制图表。到达边上的120px时,将用drawrect清除图表。另外,上部数字也是一样,每帧都用drawrect进行更新。
总结到现在为止,我们使用传感器评估套件测试了很多的传感器及部件。本期的小型TFT显示器也是一样,通过轻松操控Arduino或Raspberry Pi等小型计算机,可以根据我们的想法实现平时用普通电脑无法办到的事。因为普通的电脑较贵,无法任意随便使用,而Arduino等与普通电脑相比价格相对便宜,所以例如将本期用到的TFT显示器和Arduino Pro mini等组合起来,既可制作一个时钟或者小型游戏,还可以加上传感器评估套件的传感器做成一个数据记录仪。
|
|
 /3
/3 